


Key Takeaways
- Discover quick and efficient ways to eliminate duplicates in your datasets, streamlining data management in Excel.
- Learn how to recover lost Excel work with built-in tools, safeguarding against unexpected data loss or system crashes.
- Master simple to advanced Excel calculations and functions directly in your spreadsheet, enhancing productivity without external tools.
- Utilize the Freeze Panes feature to keep headers visible, improving navigation through large datasets.
- Insert the current date effortlessly into your spreadsheets using shortcuts, enhancing efficiency in data entry.
- Apply changes across multiple worksheets simultaneously, saving time and ensuring consistency across your workbook.
Hello everyone, you will find some neat and somewhat unique tricks for your MS Excel program. Microsoft Excel has been with us for a long time. It is one of the most popular productivity applications to date. Some users are fond of Excel as it helps them become more productive at work whereas others think Excel is complicated and doesn’t like to see the rows and column sheet of Excel. However, if you are one of the users who know how to use Excel appropriately, you will soon find out that Excel is one powerful tool to deal with. In this article, we will be discussing six Excel tips and tricks that you should know, irrespective of whether you are a beginner or an expert user of Excel.
Microsoft Excel Tips
Remove Duplicates Efficiently and Safely

Working with large datasets in Excel often leads to duplicate entries. Manually finding and removing them can be tedious and error-prone. Fortunately, Excel offers a quick and easy solution: the Remove Duplicates feature.
Here’s a step-by-step guide:
-
Select your data: Highlight the range of cells containing your data. Make sure to include headers if you have them.
-
Navigate to the Data tab: Locate the “Data” tab on the Excel ribbon.
-
Find the Remove Duplicates button: In the “Data Tools” group, click the “Remove Duplicates” button.
-
Choose your columns (optional): By default, Excel checks all columns for duplicates. If you only want to identify duplicates based on specific columns, uncheck the boxes next to the columns you don’t want to consider.
-
Expand options (advanced): (Click the “More Options” button if available in your Excel version). This allows you to:
- My data has headers: Check this box if the first row contains column headers.
- Select the first occurrence to keep: This ensures you keep the first instance of each duplicate value.
-
Click OK: Excel will scan your data and remove all duplicate rows based on your selections. It will also display a dialog box showing how many duplicates were removed.
Something to keep in mind:
- Copy your data first: It’s always a good practice to copy your original data to another sheet before using “Remove Duplicates.” This creates a backup in case you accidentally remove something important.
Recovering Your Lost Excel Work

Unexpected shutdowns or accidental closures can leave you worried about your unsaved Excel work.
1. Check for Recently Saved Files:
- Look for your file in the Recent list within the File tab. Excel automatically saves your recently accessed files.
2. Leverage AutoRecover (Windows & Mac):
- Excel has a built-in AutoRecover feature that automatically saves your work periodically, even during unexpected closures.
- Windows:
- Open Excel and click File > Open.
- Look for the Recover Unsaved Workbooks option at the bottom of the window.
- Select your file and click Open.
- Mac:
- Open Excel and navigate to File > Open Recent.
- Look for files with a temporary name ending in “.asd”. These are potential AutoRecover files.
- Double-click the relevant file to open it.
- Windows:
3. Restore a Previous Version (Windows Only):
- If the file was saved but overwritten with unwanted changes, you can restore a previous version.
- Right-click on the saved Excel file and select Properties.
- Go to the Previous Versions tab (if available). This feature relies on System Restore being enabled.
- Select the desired version and click Restore.
4. Explore File History (Windows Only):
- If you have File History enabled, it might have backed up your Excel file.
- Go to Settings > Update & Security > Backup.
- Under “Look for backed up files,” click on “More options”.
- Browse the File History and locate the desired version of your Excel document.
- Click Restore to recover it.
5. Utilize Online Versions (OneDrive, SharePoint):
- If you were working on an online version of the file in OneDrive or SharePoint, you might be able to recover previous versions.
- Access OneDrive or SharePoint online.
- Right-click on the Excel file and select Version history.
- Choose the desired version and click Restore.
Something to keep in mind:
-
- Enable AutoSave (Highly Recommended): Turn on AutoSave in Excel settings to automatically save your work at regular intervals. This significantly reduces the risk of losing data due to unexpected shutdowns.
- How to Recover an Excel File Not Saved – Check out a more in-depth article.
Mastering Calculations with Excel Formulas

Forget switching between Excel and a calculator! Excel empowers you to perform a wide range of calculations directly within your spreadsheet.
Basic Math Operations:
-
Addition:
- In a blank cell, type
=SUM(A1:A5). ReplaceA1:A5with the actual range of cells containing the values you want to add (e.g.,=SUM(B2, C3)for adding two specific cells). - Press Enter. Excel will display the sum.
- In a blank cell, type
-
Subtraction:
- In a blank cell, type
=A1-B2. ReplaceA1andB2with the cell references of the values you want to subtract. - Press Enter. The difference will be displayed.
- In a blank cell, type
-
Multiplication:
- In a blank cell, type
=A1*B2. ReplaceA1andB2with the cell references of the values you want to multiply. - Press Enter. The product will be displayed.
- In a blank cell, type
-
Division:
- In a blank cell, type
=A1/B2. ReplaceA1andB2with the cell references of the values you want to divide. - Press Enter. The quotient will be displayed.
- In a blank cell, type
Beyond the Basics:
Excel offers a vast library of functions beyond basic math. Here are some examples:
- Average: Use
=AVERAGE(A1:A10)to find the average of a range of cells. - Percentage: Calculate percentages with
=A1/B1*100. - Logical Functions: Use
=IF(A1>10, "High", "Low")for conditional statements.
Tips for Effective Formula Use:
- Cell Referencing: Use cell references (e.g., A1) instead of hardcoded values for dynamic calculations that update automatically when data changes.
Freeze Panes in Excel
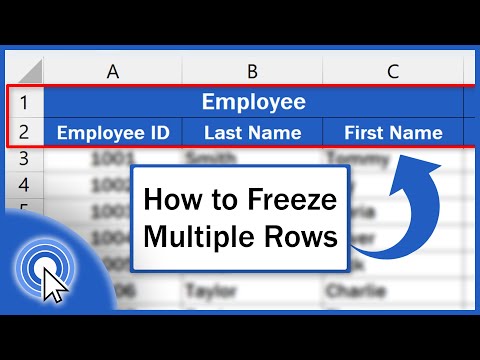
Scrolling through large spreadsheets can make it difficult to keep track of your column and row labels. Here’s how to freeze panes in Excel, ensuring your headers stay visible for easy reference:
Steps:
-
Select the Row Below Frozen Rows: Click the cell in the row below the row(s) you want to freeze. For example, if you want to freeze the top two rows, click any cell in row 3.
-
Navigate to the “View” Tab: Locate the View tab on the Excel ribbon.
-
Freeze the Panes: Click the Freeze Panes button within the Window group.
Benefits:
- Easy Reference: Frozen panes keep your column and row labels visible at all times, making it easier to navigate large datasets.
- Improved Efficiency: No more scrolling back and forth to check headers, saving you time and effort.
- Clearer Analysis: By keeping headers in view, you can maintain context while analyzing your data.
Additional Tips:
- Freeze Both Rows and Columns: To freeze both rows and columns, select the cell below the rows you want to freeze and to the right of the columns you want to freeze (e.g., cell D3 to freeze the top two rows and the first three columns).
- Unfreeze Panes: If you no longer need frozen panes, navigate back to the View tab and click Unfreeze Panes.
Two Methods for Inserting the Current Date
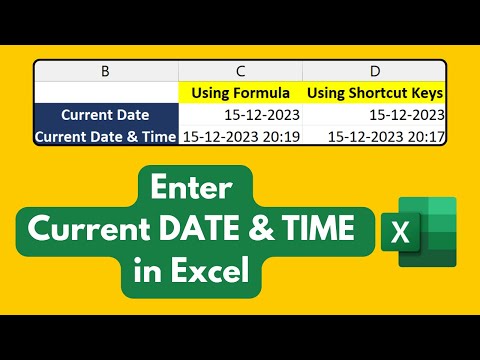
Excel offers two ways to insert the current date, depending on whether you want a static date or one that updates automatically:
Method 1: Inserting a Static Date
This method inserts a fixed date that won’t change when you reopen the spreadsheet. Here’s how:
-
Select the Cell: Click on the cell where you want to display the date.
-
Keyboard Shortcut: Press
Ctrl+;(semi-colon).
Method 2: Inserting the Today’s Date (Dynamic)
This method uses the TODAY function, which automatically updates to the current date whenever you open or recalculate the spreadsheet. Here’s how:
-
Select the Cell: Click on the cell where you want to display the date.
-
Type the Formula: Enter
=TODAY()in the formula bar.
Additional Tips:
- Formatting the Date: Once you’ve entered the date, you can format it to display in your preferred style (e.g., MM/DD/YYYY, DD-MMM-YYYY). Right-click on the cell, select “Format Cells,” and choose the desired date format.
- Inserting Current Time: To include the current time along with the date, use the
NOWfunction instead ofTODAY. TheNOWfunction updates both the date and time automatically.
Choosing the Right Method:
- Use the static date method if you want the date to remain unchanged, even when you reopen the spreadsheet (e.g., recording the date a task was completed).
- Use the
TODAYfunction if you need the date to reflect the current date whenever you open or recalculate the spreadsheet (e.g., tracking daily sales figures).
You are in a hurry in entering the data on an Excel spreadsheet, and there is one row in every column where you have to enter the date details. You don’t remember, and you go towards the bottom of the computer screen to check today’s date and enter it manually. Frustrating right? But Excel provides an easy shortcut using which you can enter the date with just one click through a keyboard shortcut. It’s ‘Ctrl + ‘. You have to get the mouse pointer towards the cell where the date needs to be placed and then click the keyboard shortcut Ctrl+. The date will be automatically filled in the cell.
Apply Changes Across Multiple Worksheets in Excel
Making the same edits to multiple worksheets can be tedious. Fortunately, Excel offers several ways to streamline this process:
Method 1: Group Worksheets (For Identical Layouts)
-
Select Worksheets: Hold down the Ctrl key (Windows) or Command key (Mac) and click the tabs of the worksheets you want to group.
-
Group the Sheets: Right-click on any of the selected tabs and choose Group Sheets.
Benefits:
- Any changes you make to one worksheet will be reflected in all grouped worksheets.
- Ideal for workbooks with identical layouts across sheets.
Drawbacks:
- Not suitable for workbooks with different layouts on each sheet.
- To edit individual sheets within the group, you’ll need to ungroup them first (right-click any tab and select Ungroup Sheets).
Method 2: Copy and Paste Formatting (For Consistent Formatting)
-
Apply Formatting: Format a cell or range of cells on one worksheet with the desired formatting (font, borders, etc.).
-
Copy Formatting: Right-click the formatted cell(s) and select Copy.
-
Select Target Worksheets: Navigate to the worksheet(s) where you want to apply the formatting.
-
Paste Formatting: Right-click on the target cells and select Format Painter.
-
Apply Formatting: Click on the cells you want to format with the copied formatting.
Benefits:
- Applies formatting quickly to multiple worksheets.
- Useful for maintaining consistent formatting across sheets.
Drawbacks:
- Only copies formatting, not formulas or data.
Method 3: Use Fill Commands (For Sequential Data)
-
Enter Starting Data: Enter your data in the first cell(s) on the first worksheet.
-
Drag and Fill: Click and hold the bottom right corner of the cell containing your data (it turns into a small plus sign). Drag down or across to the desired range of cells on the current worksheet.
-
Copy and Paste Across Sheets (Optional): If you need to fill data across multiple worksheets, copy the filled range on the first sheet and paste it onto the corresponding range on the other sheets.
Benefits:
- Quickly fills sequential data (numbers, dates) across a range.
Drawbacks:
- May not be suitable for complex data patterns.
Other Resources/websites to learn more about Excel
- Excel with Copilot: Tips for Efficient File Management and Data Formatting
- Official place to download Excel Templates – They are actually free.
- What Copilot Pro can do in Word, Excel and Powerpoint
You can also try to use an alternative that includes an Excel like software for free, LibreOffice. In the mean time please don’t be shy to leave a comment or feedback and we will do our best to help you.