Readers like you help support this site. When you make a purchase using links on our site, we may earn an affiliate commission. All opinions remain our own.
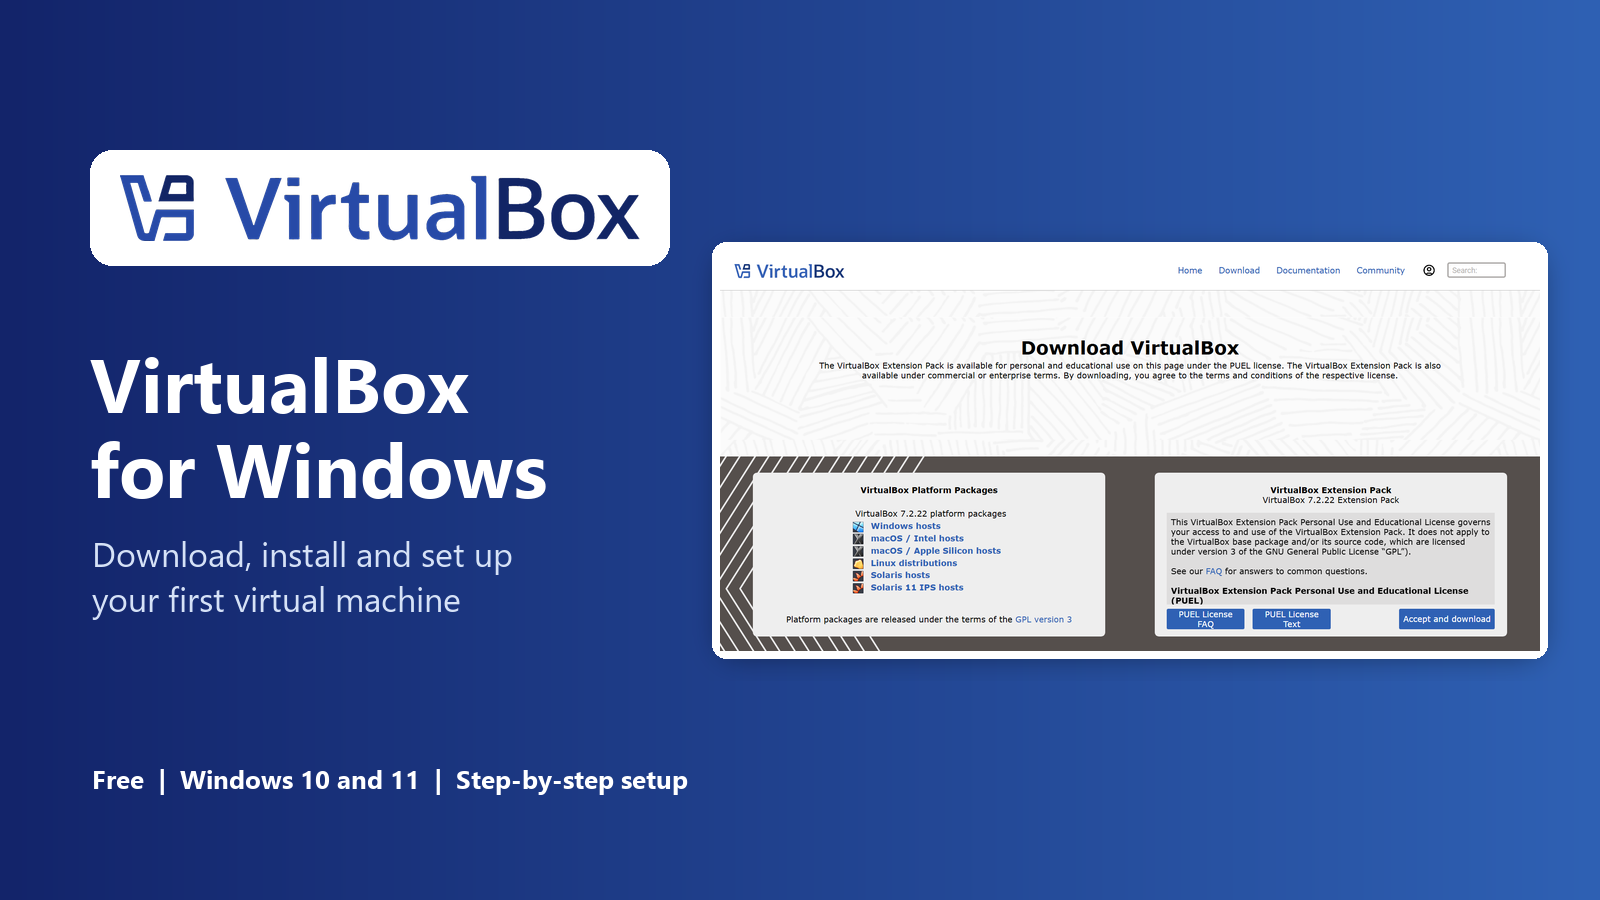
VirtualBox on Windows: download it from virtualbox.org, install it, and build your first virtual machine.
VirtualBox is a free app from Oracle, available from the official VirtualBox website, that runs other operating systems inside a window on your Windows PC. You can try Linux, test another copy of Windows, or open a risky file without touching your real system.
Each system lives in its own virtual machine, a pretend computer made of files on your drive. If something breaks inside a virtual machine, your real Windows install is not affected. You can roll it back with a snapshot or delete it and start over.
It runs on Windows 11 and Windows 10, Home included, needs hardware virtualization turned on, and takes about 250 MB once installed. It is open source, with versions for macOS and Linux too.
This guide covers what your PC needs, how to install VirtualBox, how to build your first virtual machine, and fixes for the errors beginners hit most. Still stuck? Reach out to us directly.
What Is VirtualBox?
VirtualBox is a hypervisor: a program that lets one computer act like several. It lends some of your processor, memory and disk space to a virtual machine, which then boots like a real PC.
Two words come up a lot. The host is your real computer running Windows. The guest is the system running inside the VM, such as Ubuntu or a second copy of Windows.
VirtualBox is the empty computer, so you also need the guest system as an ISO file (a disk image of an installer), such as the official Windows 11 ISO or Ubuntu Desktop.
What You Can Do With VirtualBox
We installed VirtualBox on a Windows 11 PC to take these screenshots, so they show the app as you will see it.
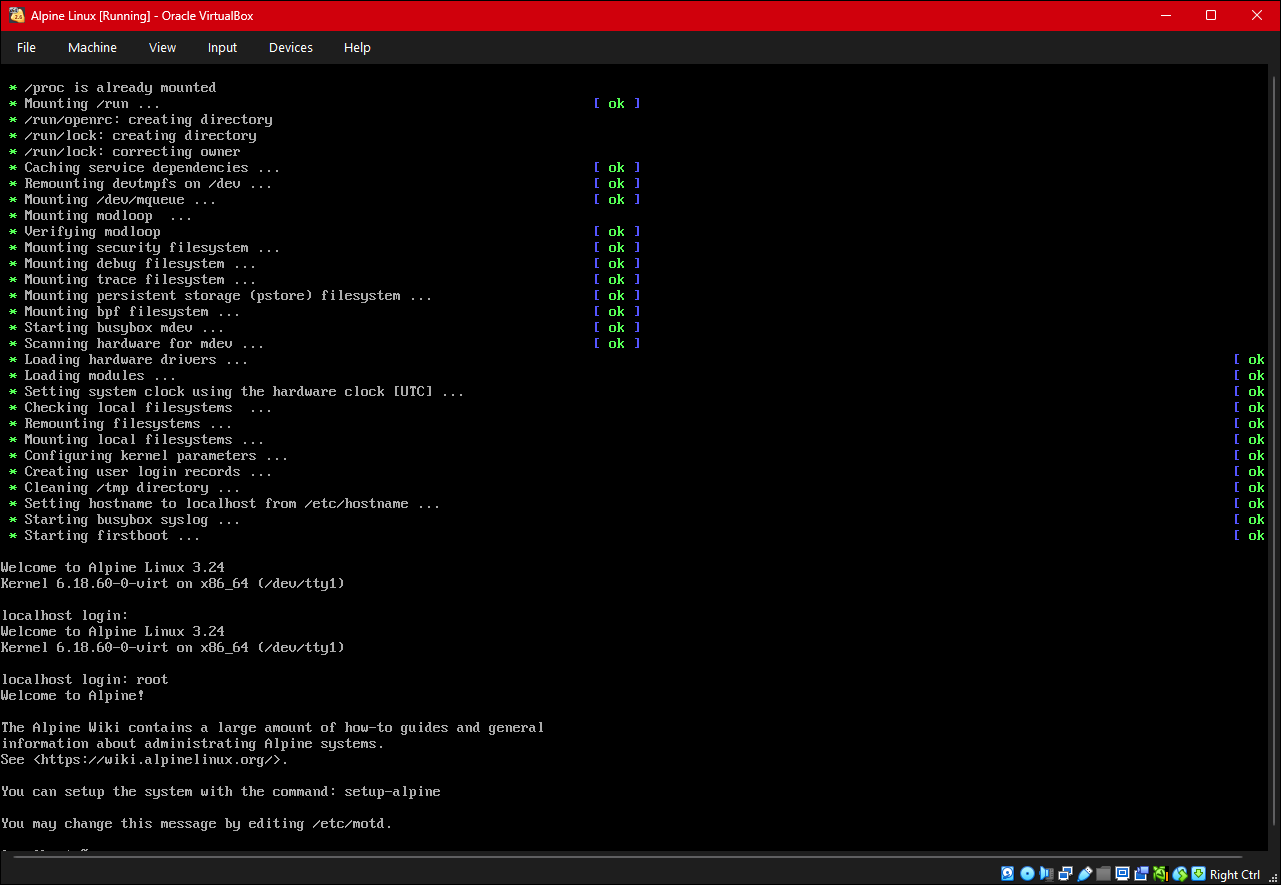
Run Linux or another Windows in a window
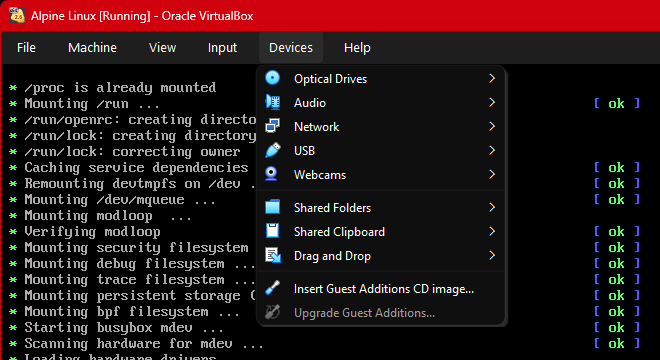
Each VM runs in its own window with a File, Machine, View, Input and Devices menu along the top. Here, a small Linux system has booted and is waiting for commands.
Closing the window does not touch your real Windows. You can save the VM’s state and pick up where you left off.
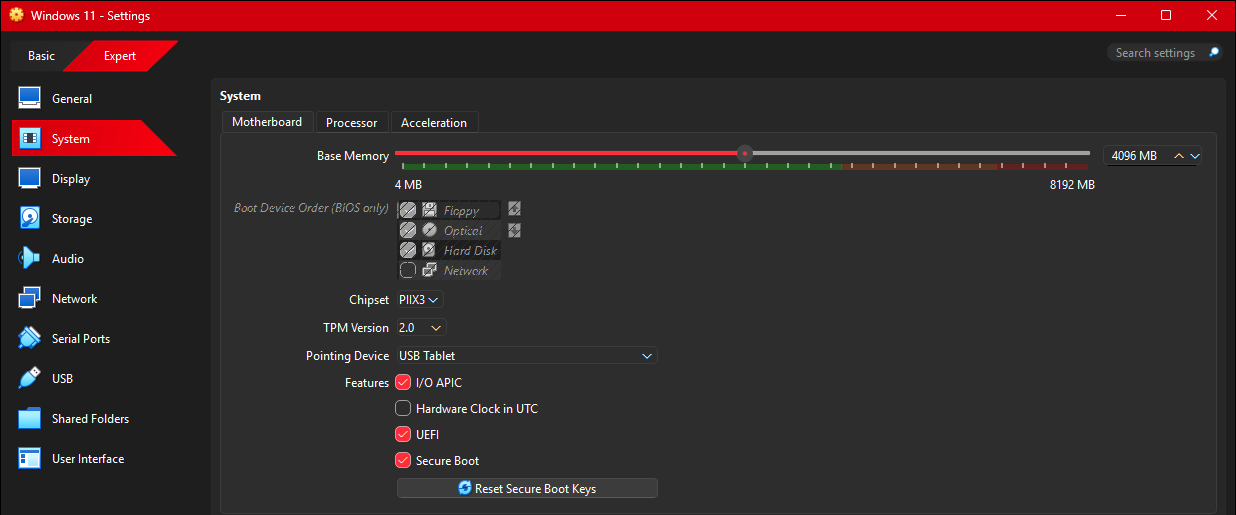
Windows 11 VMs work out of the box
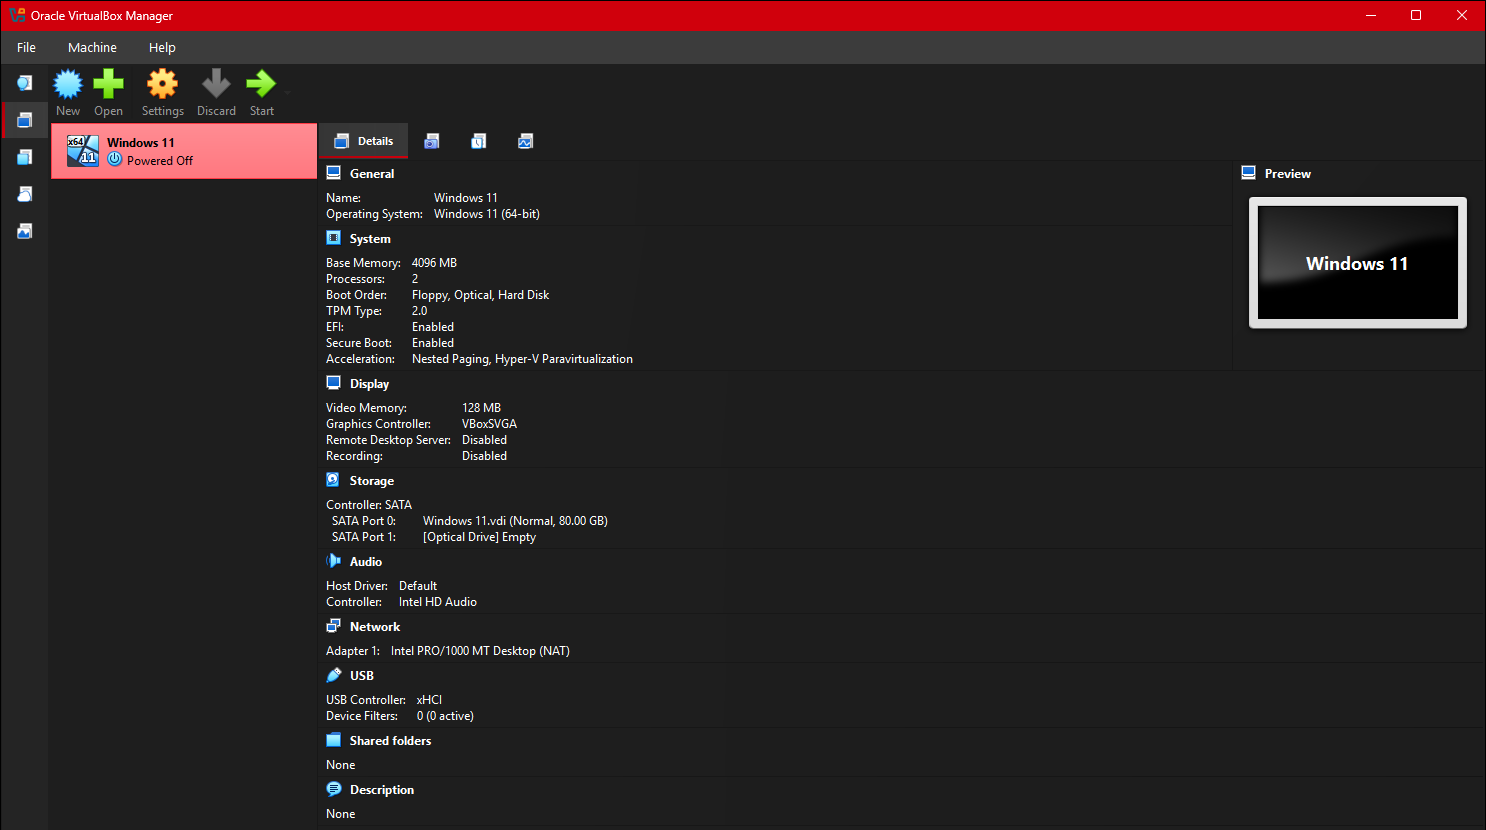
Windows 11 checks for a TPM 2.0 chip and Secure Boot before it installs. When you pick Windows 11 as the system type, VirtualBox turns on TPM 2.0, UEFI and Secure Boot for you, so there is no registry trick needed.
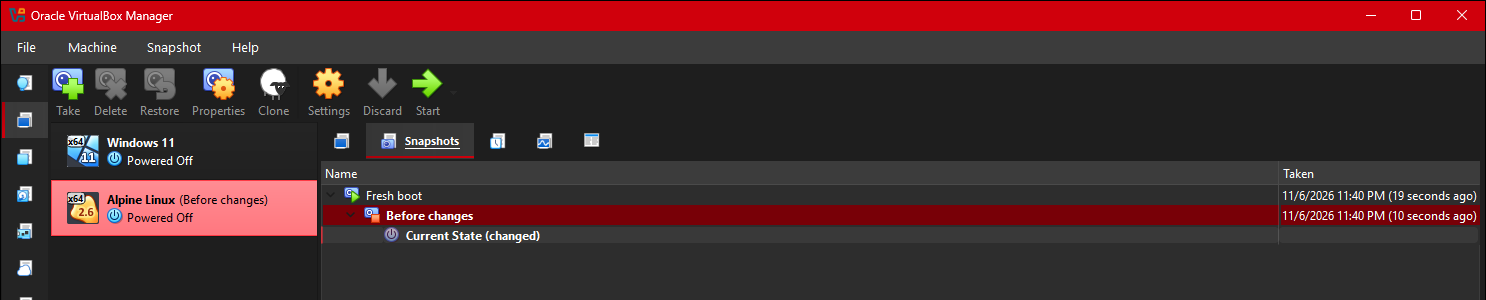
Undo anything with a snapshot
A snapshot saves the exact state of a VM. Take one before an update or a risky test, and if it goes wrong, click Restore to go back in seconds.
You can keep a whole chain of snapshots and clone any of them into a new VM.
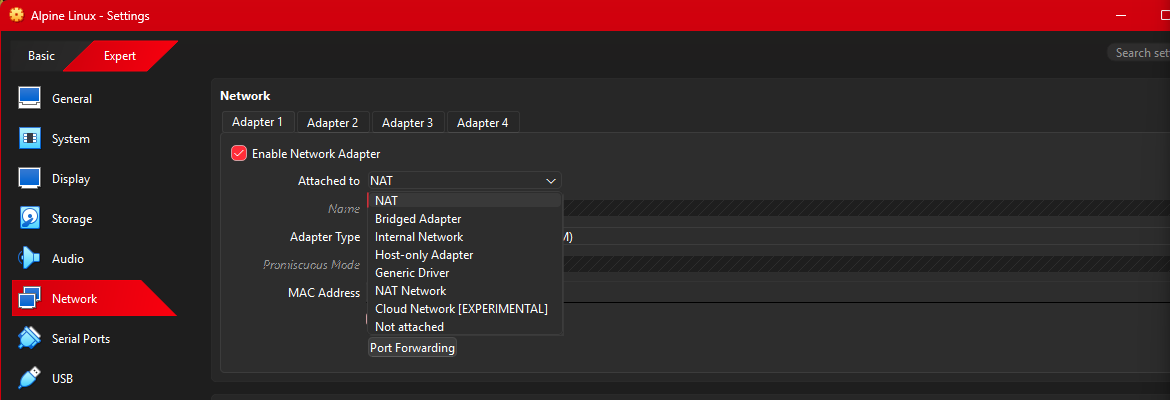
Choose how the VM gets online
NAT, the default, gives the VM internet access through your PC and keeps it hidden from your home network. Bridged Adapter makes the VM a separate device on your network, which helps when another computer needs to reach it.
Shared folders, clipboard and drag and drop
With Guest Additions installed, pick a folder on your PC that the VM sees as a network drive, and copy and paste or drag files between Windows and the guest.
Export, import and clone VMs
Export a VM as a single OVA file to back it up or move it to another computer, including a Mac or Linux PC running VirtualBox. Clone one clean VM whenever you need a fresh copy.
VirtualBox vs Hyper-V
Hyper-V is the virtual machine tool built into some editions of Windows. VirtualBox is the one to pick on Windows Home, or when you want VMs you can move to another computer. Hyper-V suits Windows Pro users who want the built-in option.
Our take
For most people trying a VM for the first time, start with VirtualBox. The New VM wizard picks sensible settings, snapshots make mistakes cheap, and it works on any edition of Windows. You can use both on one PC, but when Hyper-V is on, VirtualBox runs its VMs through it and they get slower, which the fixes section below explains.
What Your PC Needs
VirtualBox itself is small. The virtual machines are what need room, because each one borrows real memory and disk space while it runs.
Check that virtualization is on. Open Task Manager with Ctrl + Shift + Esc, go to Performance, then CPU. If the Virtualization line says Enabled, you are ready. If it says Disabled, turn on Intel Virtualization Technology, VT-x, SVM or AMD-V in your PC’s BIOS or UEFI settings.
How to Install VirtualBox on Windows
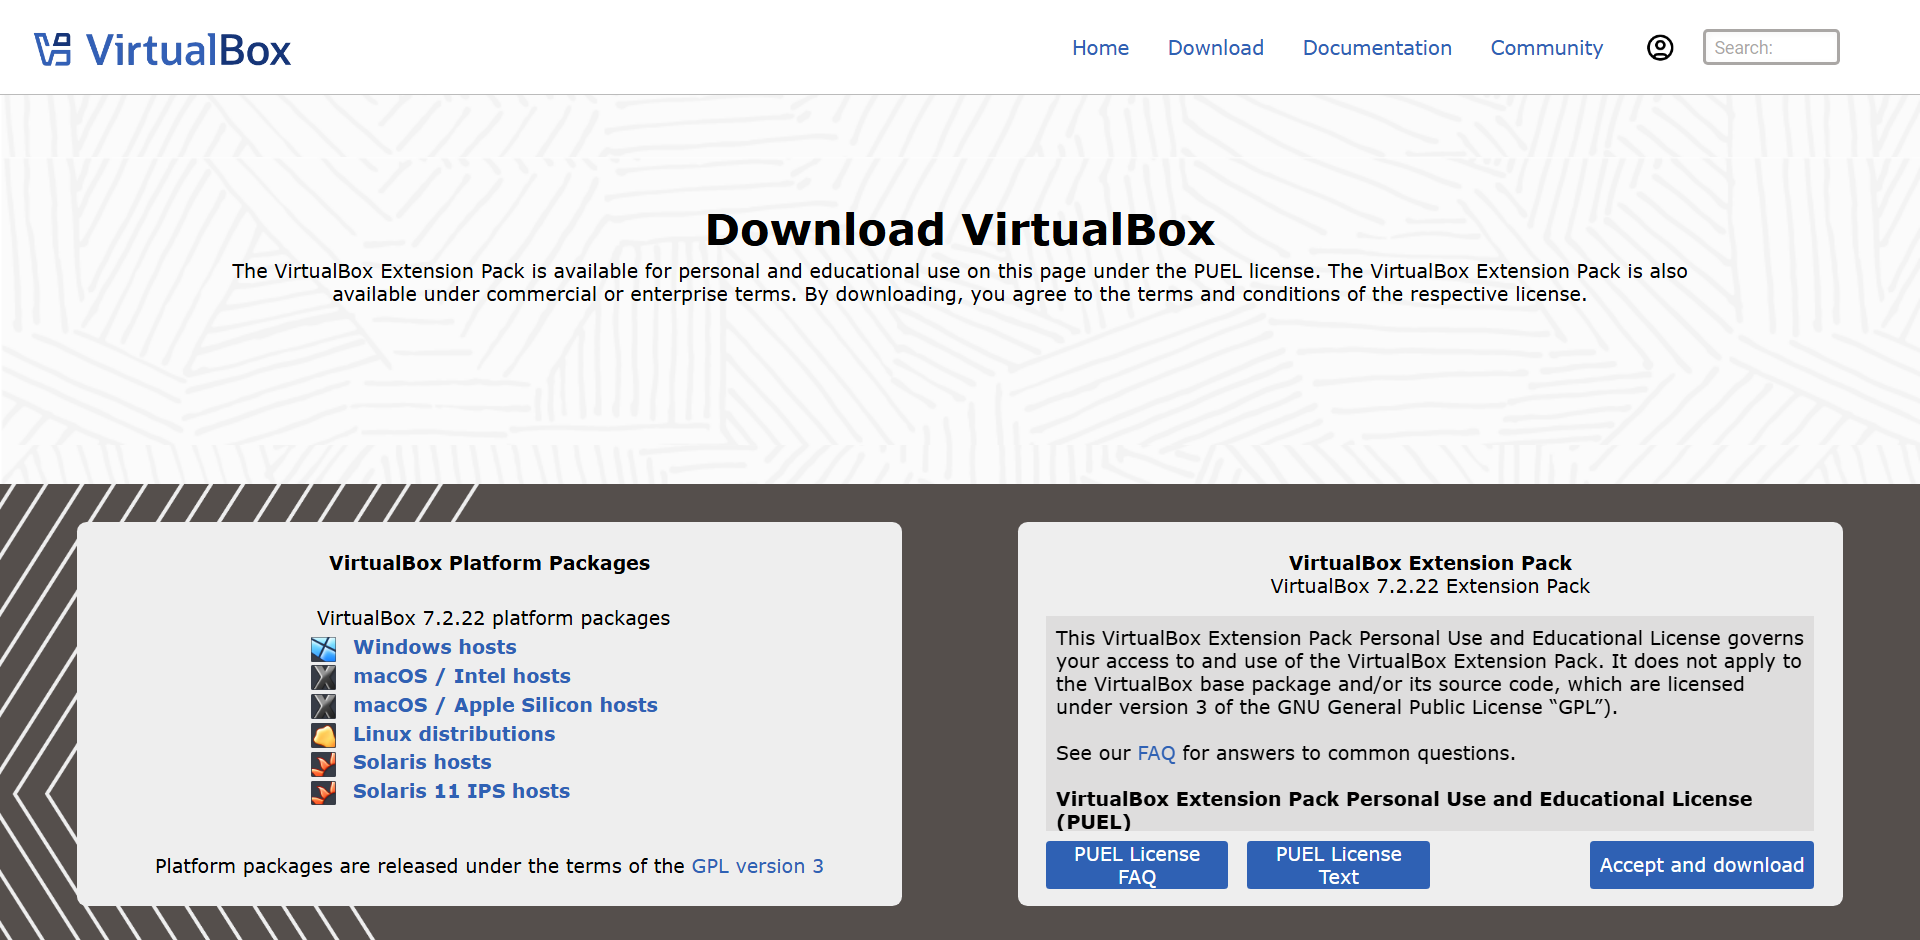
Download VirtualBox only from virtualbox.org. One installer covers Windows 11 and Windows 10, and it takes about two minutes. Save open work first, because your internet drops for a few seconds while the network drivers go in.
1 Open the VirtualBox downloads page at virtualbox.org and click Windows hosts.
2 Run the downloaded file from your Downloads folder and select Yes when Windows asks for permission.
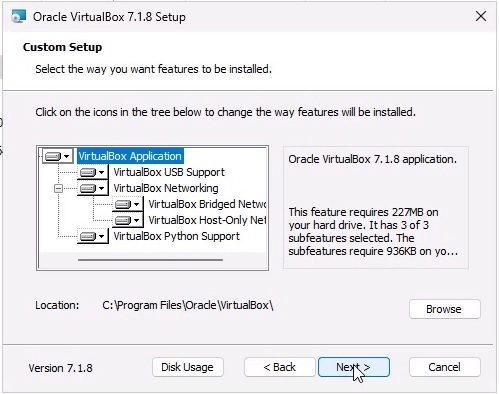
3 Click Next and accept the license, then leave every feature selected on the Custom Setup page.
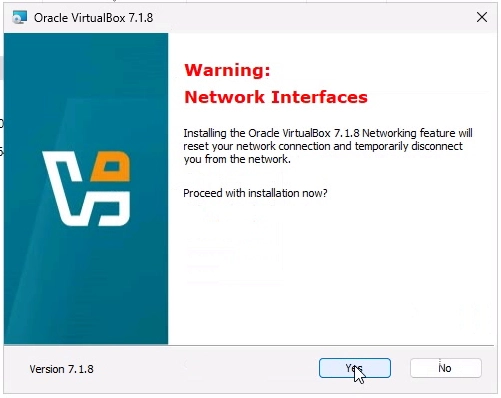
4 Click Yes on the network warning, and Yes if it mentions missing Python dependencies. Python only matters for scripting.
5 Click Install, then Install again on each Windows Security prompt for Oracle device software.
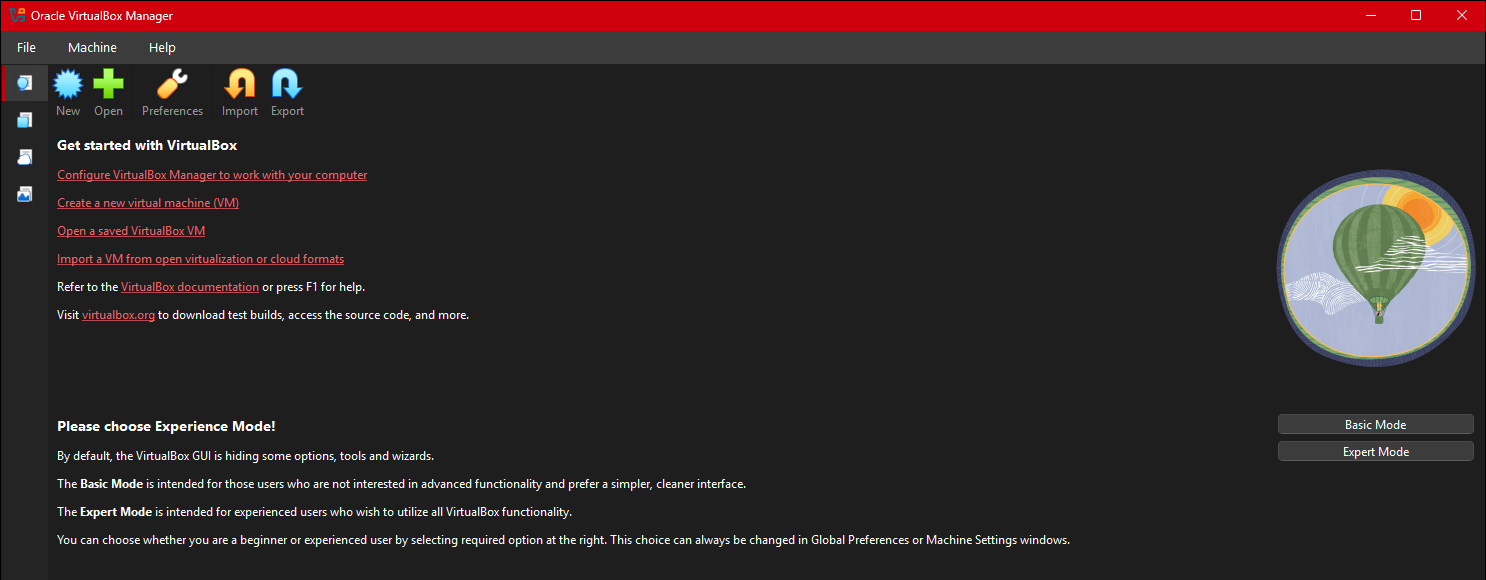
6 Click Finish and pick Basic Mode when VirtualBox asks you to choose an experience mode. You can switch to Expert Mode later.
Installer asks for the Microsoft Visual C++ 2019 Redistributable? Download the latest x64 Visual C++ Redistributable from Microsoft, install it, then run the VirtualBox installer again. The newest version covers the 2019 one.
How to Create Your First Virtual Machine
Have an ISO file ready. VirtualBox reads the ISO, fills in the system type and suggests memory, processors and disk size for you. For Windows and many Linux systems it can also run the whole install on its own.
1 Click New in the VirtualBox Manager.
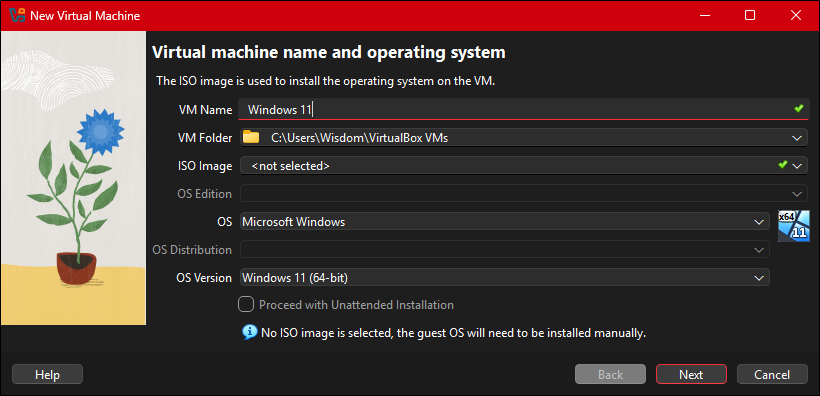
2 Type a name such as Windows 11 or Ubuntu. VirtualBox uses the name to guess the system type.
3 Pick your ISO file in the ISO Image box. Tick Proceed with Unattended Installation to let VirtualBox install the system for you, then add a user name and password.
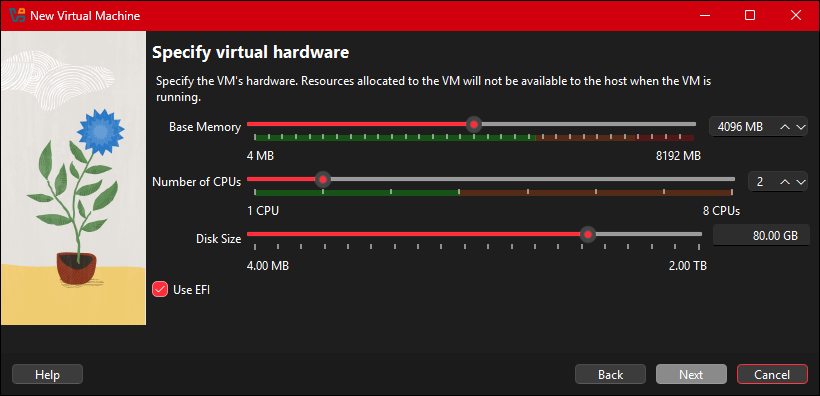
4 Click Next and check the hardware. Give the VM no more than half your PC’s memory and half its processor threads.
5 Keep the suggested disk size and click Next, then Finish. The virtual disk grows as it fills, so 80 GB does not take 80 GB on day one.
6 Select the VM and click Start. It boots from the ISO and the setup begins.
Making a Windows 11 VM
Get the installer from our Windows 11 ISO guide. VirtualBox suggests 4 GB of memory and an 80 GB disk, which covers Microsoft’s minimums. You need a Windows license to keep using it after setup.
Making a Linux VM
Linux is the easiest place to start, since most desktop versions are free. Ubuntu Desktop installs unattended in VirtualBox and runs well with 4 GB of memory and a 25 GB disk.
Install Guest Additions in Your VM
Guest Additions are drivers that go inside the VM. Install them right after the guest system, because without them the screen stays small and the mouse gets stuck. They also switch on the shared clipboard, drag and drop and shared folders.
1 Start the VM and sign in to the guest system.
2 Open the Devices menu in the VM window and choose Insert Guest Additions CD image.
3 In a Windows guest, open File Explorer, open the CD drive and run VBoxWindowsAdditions.exe. In a Linux guest, run the installer from the CD with sudo.
4 Restart the VM. The screen now resizes with the window and the mouse moves freely.
Is VirtualBox Free? The Extension Pack Explained
VirtualBox itself is free for everyone, including businesses. The base package is open source under the GPL version 3 license. The optional Extension Pack has its own license, the PUEL, which only covers personal and educational use.
Do you need the Extension Pack?
Most home users do not. Install it only if you need one of the features in the table. Businesses should read the license first, because using it at work without a commercial license breaks the terms.
How to install it
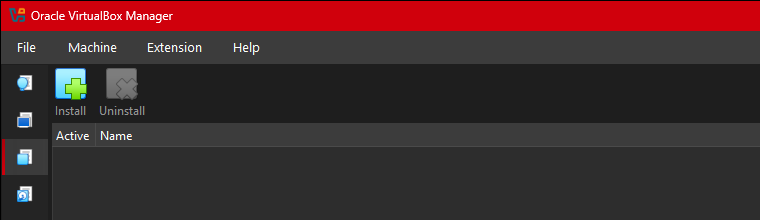
Download it from the downloads page with Accept and download. In VirtualBox, open Extensions in the left bar, click Install and pick the file. Its version must match your VirtualBox version, so update both together.
Common Problems and Fixes
VT-x is disabled in the BIOS
The VM refuses to start with an error naming VT-x or AMD-V, because hardware virtualization is off. Restart into your BIOS or UEFI settings, turn on Intel Virtualization Technology, VT-x, SVM or AMD-V, then save and restart.
Only 32-bit systems in the list
The version list shows only 32-bit choices. It is the same cause as the VT-x error: turn on virtualization in the firmware and the 64-bit choices appear.
VMs are slow, with a turtle icon
A turtle in the VM’s status bar means VirtualBox is running through Hyper-V. If speed matters more, turn off Hyper-V, Virtual Machine Platform and Windows Hypervisor Platform in Windows Features. Memory integrity in Windows Security uses it too, and turning that off lowers your protection.
VM will not start while Hyper-V is on
VirtualBox needs Windows Hypervisor Platform to work alongside Hyper-V. Search Start for Turn Windows features on or off, tick Windows Hypervisor Platform, click OK and restart.
Visual C++ Redistributable needed
The installer stops and names the Microsoft Visual C++ 2019 Redistributable. Install the latest x64 version from Microsoft and run the VirtualBox installer again.
Tiny screen, stuck mouse
The VM window does not resize and the mouse stays trapped inside. Press the right Ctrl key to free the mouse, then install Guest Additions in the guest and restart it.
Tips for Getting Started
1 Learn the Host key. The right Ctrl key frees your mouse and keyboard from the VM. Host + F switches full screen on and off.
2 Take a snapshot before every big change. Restoring one takes seconds. Reinstalling takes an hour.
3 Shut down from inside the guest. Use the guest’s own Shut down button, or save the machine state from the close menu. Powering off is like pulling the plug on a real PC.
4 Keep VMs on a drive with room to grow. VMs live in a VirtualBox VMs folder in your user folder by default. Pick another drive in the New VM wizard if your main drive is small.
5 Update everything together. When VirtualBox tells you a new version is out, install it over the old one, then update the Extension Pack, if you use it, and Guest Additions in each VM.
Removing VirtualBox later? Go to Settings, Apps, Installed apps, find Oracle VirtualBox and choose Uninstall. Your VMs stay in the VirtualBox VMs folder until you delete it yourself.
Frequently Asked Questions
Does VirtualBox work on Windows 11 Home?
Can I use VirtualBox on a Windows on Arm laptop?
Can I run macOS in VirtualBox on Windows?
What are the system requirements for VirtualBox on Windows?
Is VirtualBox safe to install?
Can I play games in VirtualBox?
Support and Community
- VirtualBox, the project’s own site from Oracle, with news and licensing details.
- VirtualBox User Manual, which covers every setting, from networking modes to snapshots.
- VirtualBox forums, the official place to ask setup questions.
- VirtualBox changelog, to see what changed in each release.
- VirtualBox on GitHub, for the source code and bug reports.
- r/virtualbox on Reddit, a user-run community for fixes and setups.
More Windows software guides: Windows 11 Official ISO · Windows 11 Media Creation Tool · Windows 10 Installation Media · How to Upgrade to Windows 11 · BlueStacks for Windows · Best Free Windows Software
Discover more from Windows Mode
Subscribe to get the latest posts sent to your email.









Add your first comment to this post