Readers like you help support this site. When you make a purchase using links on our site, we may earn an affiliate commission. All opinions remain our own.

Movie Maker by V3TApps is a third-party video editing app for Windows that recreates the classic Windows Movie Maker experience. Designed for Windows 10 and 11, it offers a familiar timeline-based interface for users who prefer straightforward video editing without advanced features.
This guide covers everything you need to know about the app: how to download it safely, what features are included, system requirements, and how it compares to other options like Clipchamp. You’ll also find a quick tutorial to help you create your first edited video.
⚠️ Important: This is NOT the original Microsoft Windows Movie Maker (discontinued in 2017). This is a modern third-party app created by V3TApps that brings similar functionality with support for current video formats.
Beginner Friendly
Free + Pro Option
Quick Edits
✓ Yes
How to Download & Install Movie Maker
1
Open Microsoft Store
Press Win + S and search “Microsoft Store” or use the direct link below to avoid clone apps.
2
Click “Get” or “Install”
The base version is 100% free with no trial period. Installation takes 1-2 minutes on most systems. No adware or bundled software.
3
Launch & Start Creating
Open the app, click “New Project”, then drag video files onto the timeline. That’s it, you’re editing.
Official source for Movie Maker by V3TApps
![]()
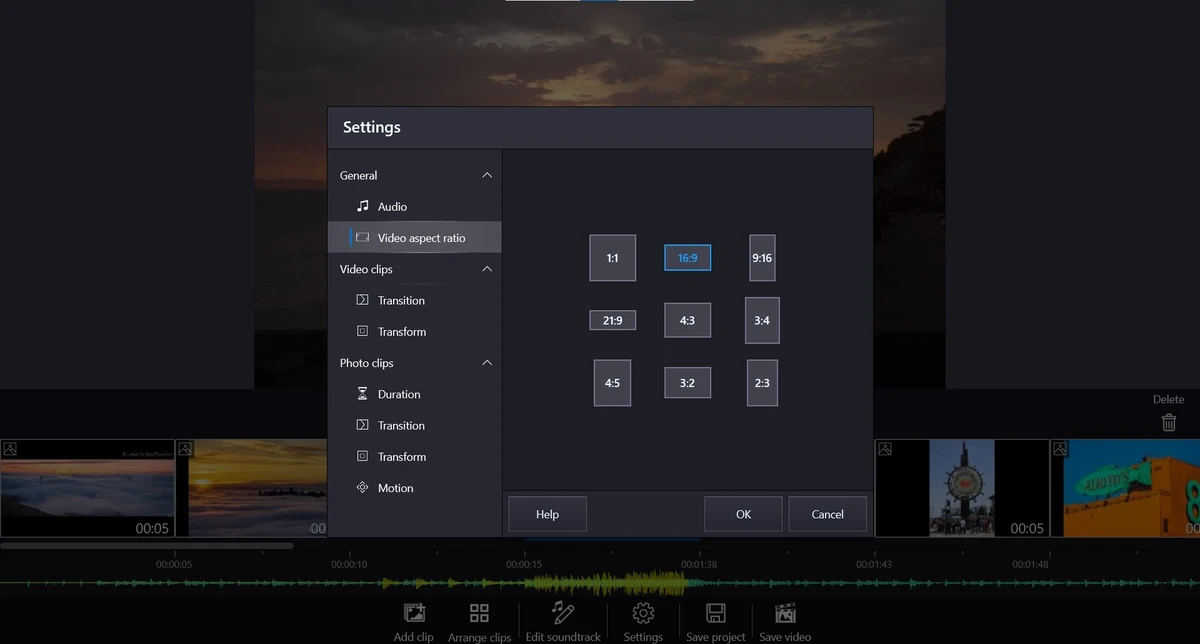
System Requirements (2026)
| Component | Minimum | Recommended |
|---|---|---|
| Operating System | Windows 10 (version 1809+) | Windows 11 (22H2 or newer) |
| Processor | Intel Core i3 / AMD Ryzen 3 | Intel Core i5 / AMD Ryzen 5 (for 4K) |
| RAM | 4GB | 8GB+ (16GB for smooth 4K editing) |
| Storage | 500MB app + project space | SSD with 5GB+ free space |
| Graphics | DirectX 11 compatible | DirectX 12 with hardware acceleration |
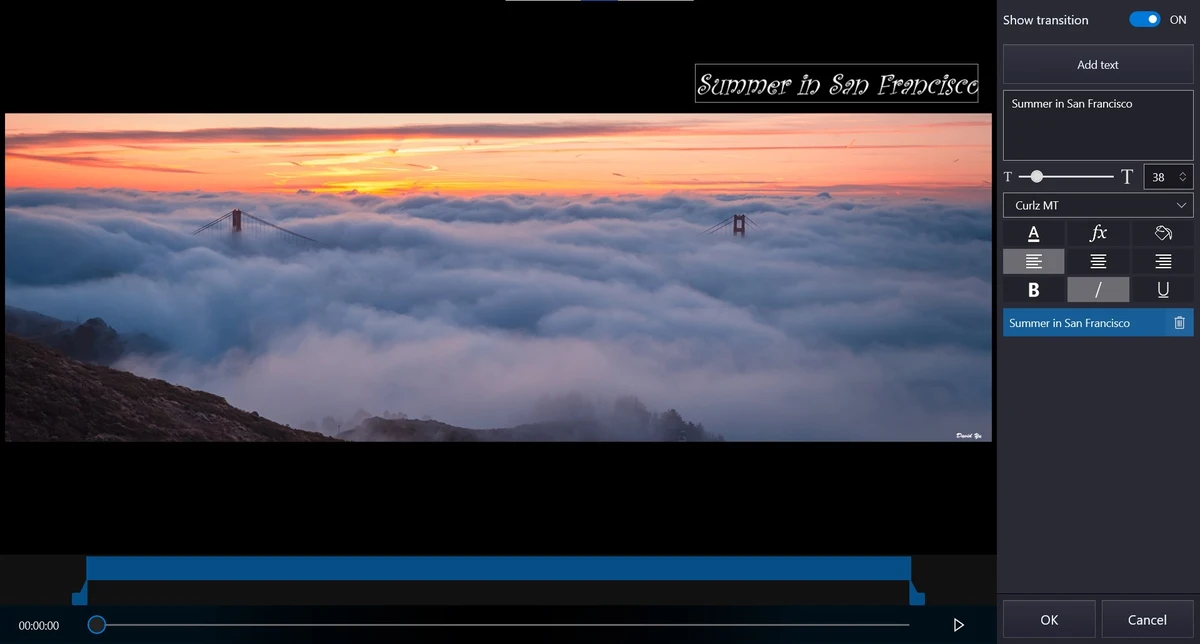
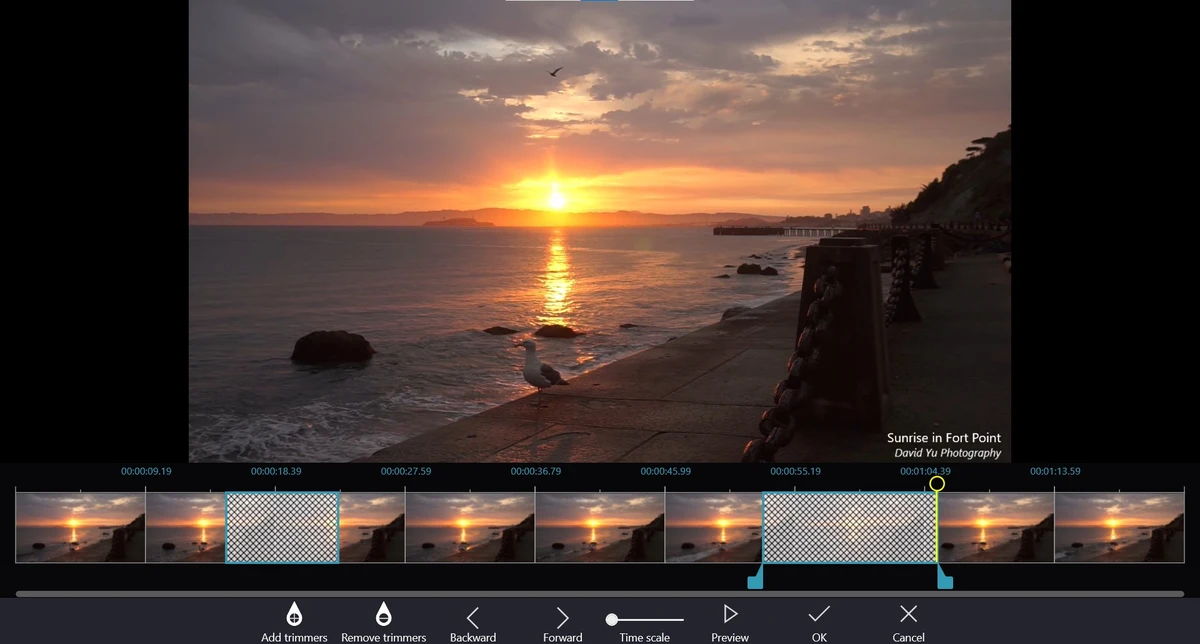
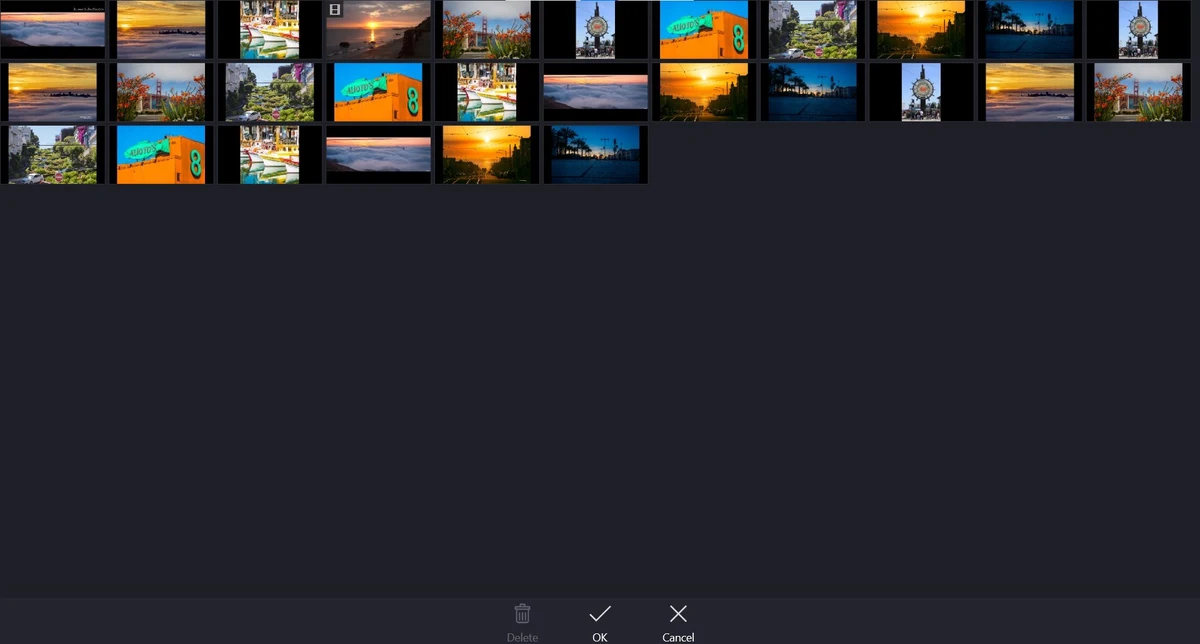
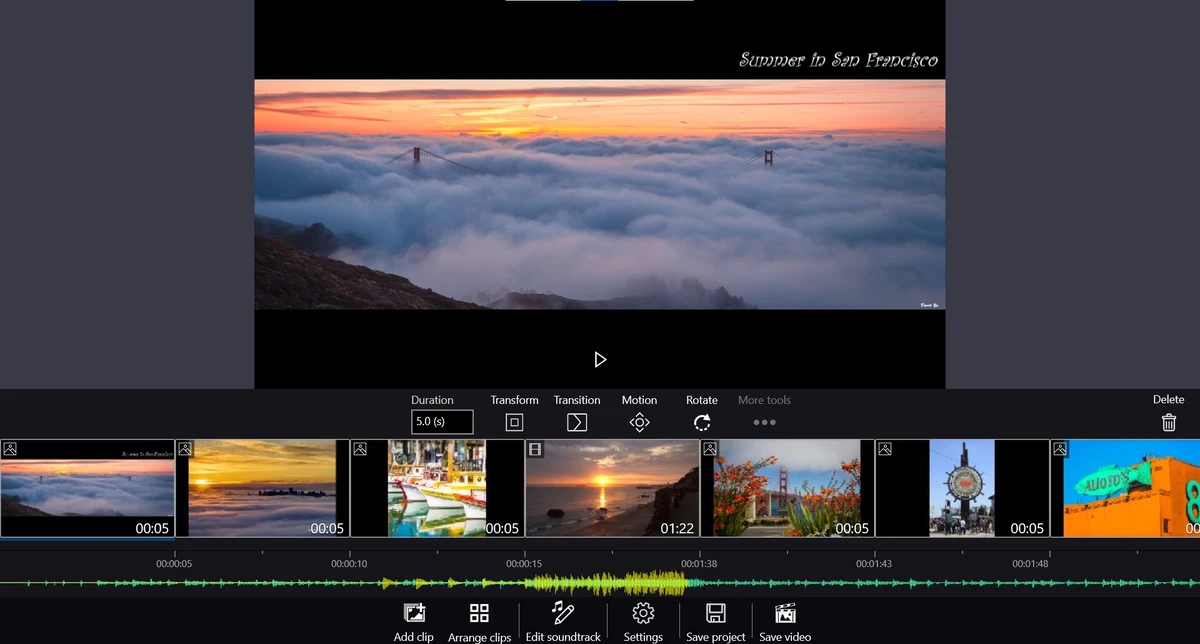
Movie Maker Interface Gallery
Get a visual tour of the editing interface, see how the timeline, preview window, and tools are organized.
Movie Maker vs. Clipchamp: Key Differences
Microsoft now includes Clipchamp as the default video editor in Windows 11, but many users still search for and use Movie Maker. Here’s a comparison of their key differences to help you understand which might work better for your needs.
| Feature | Movie Maker | Clipchamp |
|---|---|---|
| Internet Connection | Works offline | Requires online login |
| Performance | Lightweight desktop app | Web-based (heavier) |
| Interface Style | Classic timeline | Modern timeline |
| Learning Curve | Very simple | Moderate |
| AI Features | None | Auto-captions, effects |
| Stock Media | None | Extensive library |
| Best Suited For | Offline work, older PCs | Cloud projects, AI tools |
Understanding the Differences:
Movie Maker works well for basic offline editing with a familiar interface, while Clipchamp offers more advanced features like AI tools and stock content but requires an internet connection. Neither is objectively better; it depends on your specific editing needs and workflow preferences.
Key Features: Free vs. Pro Version
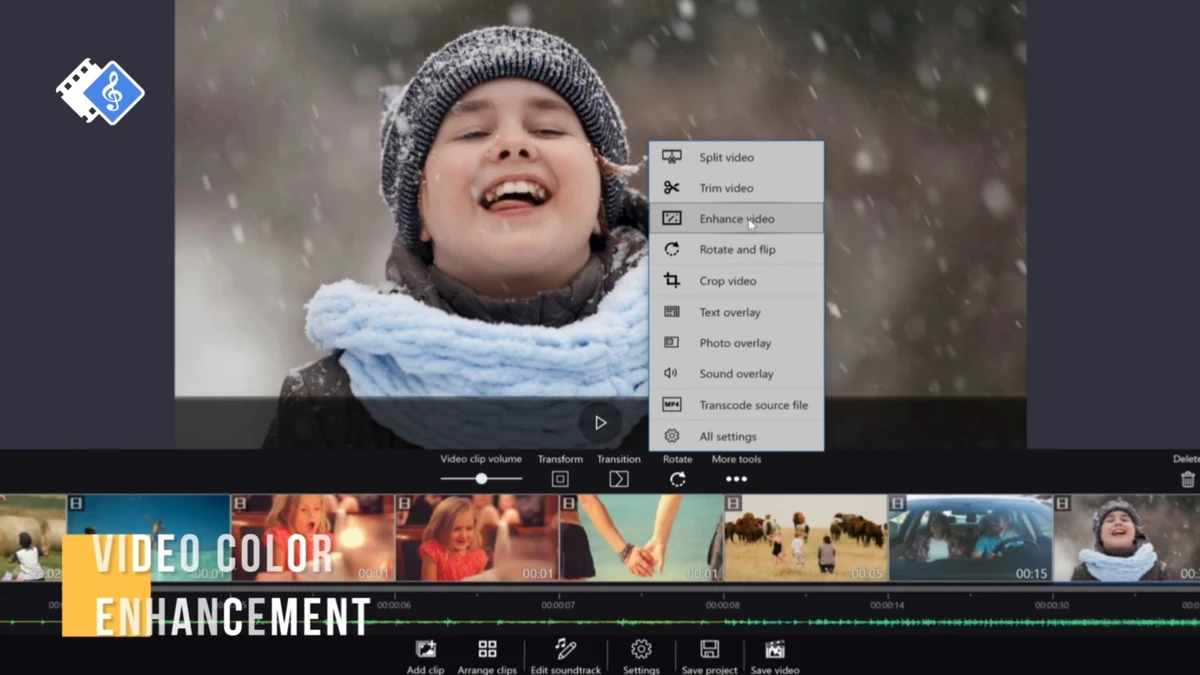
✂️ Trim, Cut & Split
Precision tools to remove unwanted sections from the beginning, middle, or end of your clips. Perfect for cleaning up screen recordings, gameplay footage, or Zoom meetings.
FREE
🔗 Merge & Combine Videos
Seamlessly join multiple video clips into one continuous file. Ideal for combining vacation footage, creating compilations, or assembling multi-scene projects.
FREE
🎵 Audio Control
Detach audio from video, add background music from your library, adjust volume levels, and apply fade-in/fade-out effects for professional-sounding results.
FREE
🖼️ Transitions & Effects
Apply classic transitions between clips, fade, slide, wipe, dissolve to create smooth scene changes. Makes your video flow naturally instead of jumping between cuts.
FREE
📝 Text Overlays & Titles
Add opening titles, end credits, subtitles, or on-screen text anywhere in your video. Customize fonts, colors, and positioning. Basic emoji support included.
FREE
⚡ Pro Version Features
The Pro version unlocks additional capabilities including 4K/UHD export, removal of watermarks (where applicable), hardware acceleration for faster rendering, premium effects and stickers, and priority support. Check the Microsoft Store listing for current pricing and availability.
PRO UPGRADE
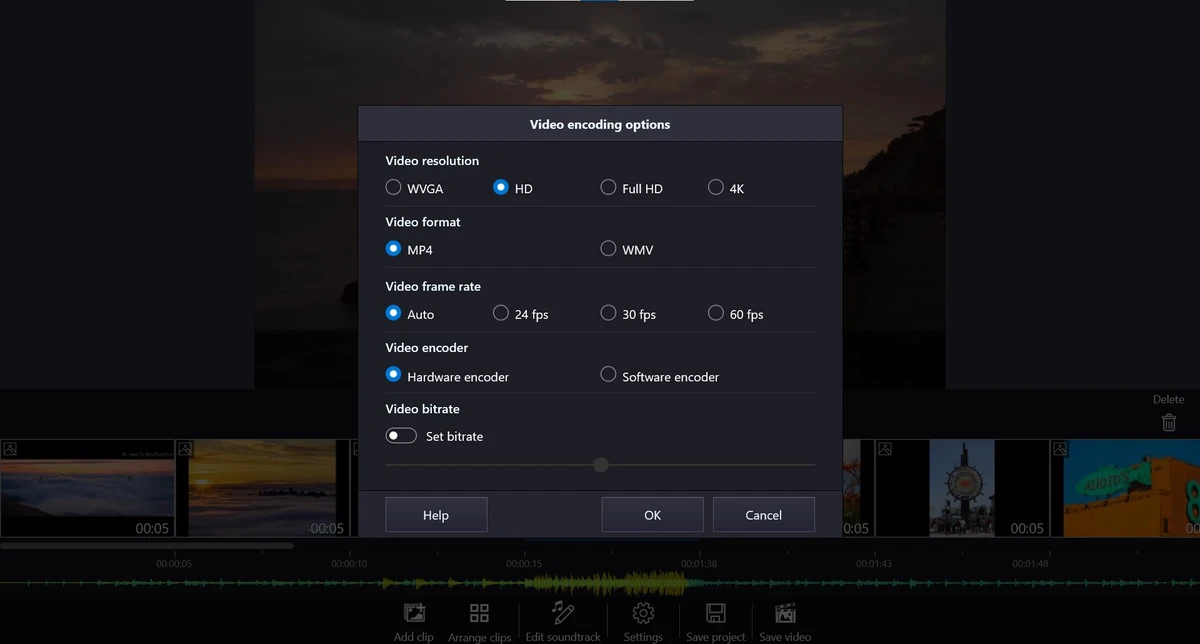
Supported Video Formats (2026)
📥 Input Formats
MP4, AVI, WMV, MOV, MKV, FLV, 3GP, MPEG, WebM
Supports most smartphone & camera footage
📤 Export Formats
MP4 (H.264/H.265), WMV
Resolution: 480p, 720p, 1080p, 4K (Pro)
🎧 Audio Formats
MP3, WAV, AAC, WMA, M4A, OGG
Add background music from any source
Common Questions & Troubleshooting
Is this the original Microsoft Windows Movie Maker?
No. Microsoft officially discontinued Windows Movie Maker in January 2017 and removed all download links. This V3TApps version is a modern third-party alternative that recreates the classic interface and workflow, but with updated codec support for today’s video formats (including 4K from smartphones and GoPros). It’s not affiliated with Microsoft.
Does the free version have a watermark?
This can vary depending on your region and the version installed. Some users report a watermark appearing when using certain Pro features in the free version, while basic editing functions typically do not add watermarks. The Pro upgrade removes any watermarks if present.
What export formats are supported?
MP4 is the default and most widely compatible export format (using H.264 or H.265 codecs). You can also export to WMV if needed. Resolution options range from 480p (for smaller file sizes) up to 4K/UHD with the Pro version. For YouTube, Instagram, or TikTok, we recommend exporting in 1080p MP4.
Why is my export taking so long?
Common causes: (1) Older CPU without hardware acceleration, (2) Exporting at very high resolution (4K), (3) Many effects or transitions applied, (4) Large file sizes. Solutions: Enable hardware acceleration in settings (if available), close other programs during export, export at 1080p instead of 4K, or upgrade to the Pro version which includes optimized rendering.
Can I edit videos from my iPhone or GoPro?
Yes! Movie Maker supports modern video codecs including H.264, H.265/HEVC (common on newer iPhones), and MP4 formats from GoPros, DJI drones, and most action cameras. Simply transfer the files to your PC via USB cable or cloud storage, then import them into your project.
The app crashes when I import videos. What should I do?
Quick fixes: (1) Update Windows to the latest version, (2) Install the latest video codecs (download the free K-Lite Codec Pack), (3) Make sure you have at least 2GB of free RAM, (4) Try importing smaller files first to test, (5) Reinstall the app from Microsoft Store. If crashes persist, check if your video files are corrupted, try opening them in VLC Media Player first.
How do I add subtitles or captions?
Use the Text tool to manually add subtitles frame-by-frame. Click “Add Text” on the timeline, type your caption, adjust the duration to match your speech, then position it at the bottom of the frame. For longer videos, this can be time-consuming, if you need automatic caption generation, consider using Clipchamp or a dedicated subtitle tool, then import the video with burned-in captions.
Quick Start Tutorial: Your First Video in 5 Minutes
Follow this step-by-step guide to create your first edited video project:
- Create a New Project: Open Movie Maker and click “New Project” on the home screen.
- Import Your Clips: Click “Add Videos” or drag video files from your folder directly onto the timeline.
- Arrange Your Timeline: Drag clips to reorder them. Delete unwanted clips by selecting and pressing Delete.
- Trim Excess Footage: Click a clip, use the scissors icon to split it, or drag the edges to trim.
- Add Transitions: Click between two clips, select “Transitions,” and choose an effect (fade, slide, etc.).
- Insert Text or Titles: Click “Add Text,” type your message, and adjust font, size, and position.
- Add Background Music: Click “Add Music,” browse to your MP3/WAV file, and adjust the audio volume slider.
- Preview Your Video: Hit the Play button in the preview window to watch your edit.
- Export Your Project: Click “Save Video,” choose resolution (720p or 1080p recommended), pick a destination folder, and click “Start.” Done!
Alternatives to Consider
If Movie Maker doesn’t meet your specific needs, here are other solid video editing options for Windows users in 2026:
- Best Video Editing Apps – Professional-grade editor that’s completely free. Steeper learning curve but incredibly powerful for color grading and effects.
- DaVinci Resolve – Professional-grade editor that’s completely free. Steeper learning curve but incredibly powerful for color grading and effects.
- Microsoft Clipchamp – Built into Windows 11. Best if you need AI-powered tools, stock media libraries, and don’t mind working online.
- Shotcut – Open-source, free, and packed with advanced features. Good middle ground between simplicity and power.
- OpenShot – Another free, open-source option with a clean interface. Great for beginners who want more control than Movie Maker.
- History of Windows Movie Maker – Learn about the legacy and evolution of the original Microsoft software.
Download Information
Movie Maker by V3TApps is available for free from the Microsoft Store, with optional Pro features available as an in-app upgrade.
Compatible with Windows 10 and Windows 11
Discover more from Windows Mode
Subscribe to get the latest posts sent to your email.